Deploy Oracle E-Business Suite Cloud Manager 23.1.1 on OCI
There are
four distinct categories of users referenced throughout this document: tenancy
administrator, network administrator, Oracle E-Business Suite Cloud Manager administrator,
and Oracle E-Business Suite administrators. Their roles are listed as follows:
·
Tenancy administrator
o
Creates compartments
o
Creates policies
o
Creates groups
o
Creates identity provider (IDCS) group mapping
to manage authentication
o
Creates users
·
Network administrator
o
Designs network
o
Implements network design with cloud
resources:
§
VCNs
o
Subnets
o
Gateways
o
Routing tables
o
Security lists/groups
o
Security rules
§
Fast Connect
- Oracle E-Business Suite Cloud Manager
administrator
o
Deploys Oracle E-Business Suite Cloud Manager
o
Defines network profiles to map:
§
Compartments
§
Network resources
o
Leverages compartments and network resources
created previously
- Oracle E-Business Suite administrators
o
Provisions and maintains Oracle E-Business
Suite environments
o Leverages network profiles defined previously
Note: If you wish, an Oracle E-Business Suite Cloud Manager administrator can also perform the duties of the network administrator and an Oracle E-Business Suite administrator. This is appropriate if you are configuring the system for demonstration use, or in any other circumstance where a single DBA will be performing all these roles. To accomplish this, you will make this user a member of the network administrators group and Oracle E-Business Suite administrators group.
Create Oracle Cloud
Infrastructure Resources
Create Compartments
There are two types of compartments that we will refer to:
· Cloud Manager Compartment - Compartment that holds the Oracle E-Business Suite Cloud Manager Compute instance
Network Compartment - Compartment that holds network resources.
If you are giving a demonstration, you might choose to use one compartment for all components.
Oracle
E-Business Suite Cloud Manager supports the use of nested compartments. Diagram 2 depicts
the compartment hierarchies that have been explicitly certified:
Diagram 2
- Compartment Topology Examples
To create
each compartment, perform the following
- While signed in to the Oracle Cloud
Infrastructure Service Console, open the navigation menu and click Identity
& Security. Under Identity, click Compartments.
- On the Compartments page, click Create
Compartment.
- In the dialog window, enter the required
details:
- Name:
Enter the compartment name. For
example, network-compartment or ebscm-compartment.
- Description:
Enter a description of your choice.
- Parent Compartment:
Select the root compartment under which the new compartment will be
created.
- Click Create Compartment.
Create Groups and Assign
Policies:
You will
define two groups and assign the required policies.
§ The network administrators group (for
example, netadmin-grp).
§ The Oracle E-Business Suite Cloud Manager administrators group (for example, ebscmadmin-grp).
Run the
following commands to create the two groups and assign the required policies:
- Open the navigation menu and click Identity
& Security. Under Identity, click Domains.
- Select the root compartment in the Compartment drop-down
list.
- Within the list of domains, click the
link for the "Default" domain.
- Click Groups.
- Click Create group.
- In the dialog window, enter the required
details:
- Name:
Enter the name for the group. For example, netadmin-grp and ebscmadmin-grp.
- Description:
Enter a description of your choice.
- Click Create.
Assign Policies
1. Create
networkcompartment-policy
- Open the navigation menu and click Identity
& Security. Under Identity, click Policies.
- Create a policy for the network
compartment to allow network administrators to manage it and for Oracle
E-Business Suite Cloud Manager administrators to use it:
- Select the network compartment from
the Compartment drop-down list on the left.
- Click Create Policy.
- Name:
Enter a name. networkcompartment-policy
- Description: network administrator group policies0
- In the Policy Builder section, click
the Show manual editor
Allow group netadmin-grp to manage
virtual-network-family in compartment network-compartment
Allow group ebscmadmin-grp to use
virtual-network-family in compartment network-compartment
3. Click Create.
2. ebscmcompartment-policy
Identity & Security. Under Identity, click Policies=>ebscmcompartment-policy
=>description – Cloud manager compartment policies.
Click Show manual editor
Allow group ebscmadmin-grp to manage
instance-family in compartment ebscm-compartment
Allow group ebscmadmin-grp to use load-balancer in
compartment ebscm-compartment
Allow group ebscmadmin-grp to manage tag-namespaces
in compartment ebscm-compartment
Create
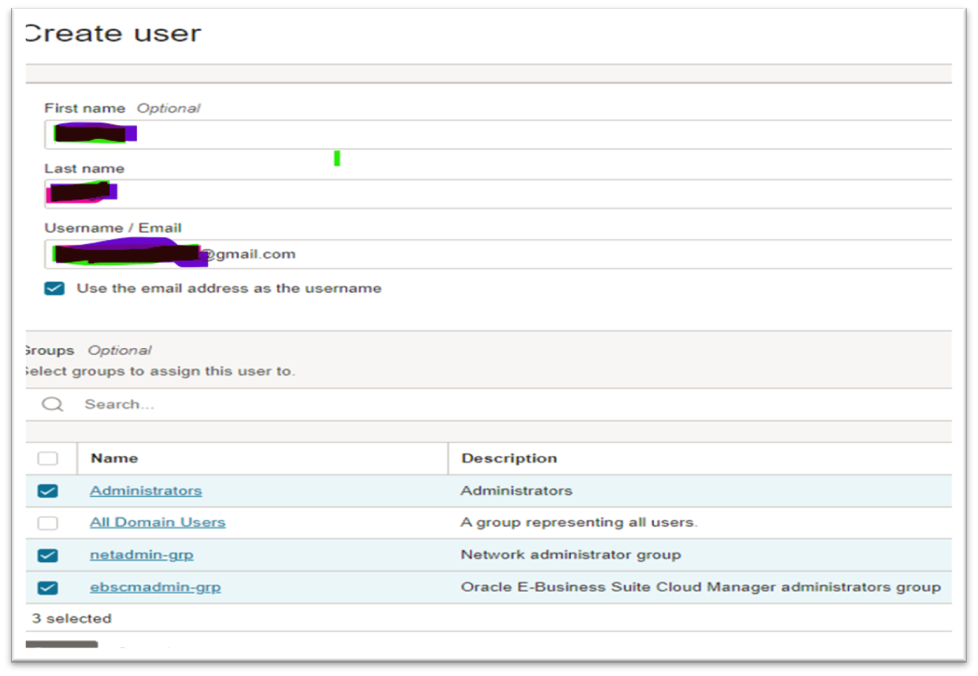
2.3 Create Users and Assign to
Appropriate Groups in OCI Service Console
- Open the navigation menu, and
click Identity & Security. Under Identity,
click Domains.
- Select the root compartment in the Compartment drop-down
list.
- Within the list of domains, click the
link for the "Default" domain.
- On the left hand side, click Users.
- Click Create User.
- In the Create User dialog box, enter the
following:
- First Name: First name of the
user.
- Last Name: Last name of the
user.
- Username / Email: A valid email
ID.
- Groups: Select the group that
corresponds to the user you are creating. For example, if you are
creating the Cloud Manager administrator, select the Cloud Manager
administrators group. If you are creating the network administrator,
select the network administrators group.
- Click Create.
- Grant the newly created user the
Application Administrator role by following the steps in Assigning
Users to Roles in the Oracle Cloud Infrastructure
Documentation.
Create Network Resources for Deploying Oracle E-Business Suite Cloud Manage:
Create a Virtual Cloud Network
- From the OCI Service Console, click the
menu icon at the top left to open the navigation menu. Under CORE
INFRASTRUCTURE, go to Networking and click Virtual Cloud
Networks.
- Click Create VCN and enter the
required details for your VCN:
- CREATE IN COMPARTMENT: Select your network compartment.
- NAME: Supply a name, such
as ebscm-vcn.
- CIDR BLOCK: Specify your choice
of CIDR (for example, 10.0.0.0/16).
- Click Create VCN at
the bottom of the window.
Note: When
creating the VCN, accept the default DNS resolver. Oracle E-Business Suite
provisioning in Oracle Cloud Infrastructure does not currently support a
non-default DNS resolver VCN.
Create Network Resources for Use with Public Subnets
Create an Internet Gateway
To create
an internet gateway:
- On the Virtual Cloud Networks screen,
click the link with the name of your VCN, such as ebscm-vcn.
- Under Resources on the
navigation menu at the left, select Internet Gateways.
- Click Create Internet Gateway:
- CREATE IN COMPARTMENT: Select your network compartment.
- NAME:
Optional, but you can specify a name such as ebscm-igw.
- Click Create Internet
Gateway at the bottom of the window.
Create Route Tables
You will create two separate route tables, one for the Oracle E-Business Suite Cloud Manager Compute instance and one for the load balancer. In the following examples, we will use the names ebscm-RouteTable and lbaas-RouteTable, respectively.
To create
the route tables:
- On the Virtual Cloud Networks screen,
click the link with the name of your VCN, such as ebscm-vcn.
- Under Resources in the navigation
menu at the left, select Route Tables.
- Click Create Route Table:
- CREATE IN COMPARTMENT: Select your network compartment.
- NAME:
Specify a name such as ebscm-RouteTable or lbaas-RouteTable.
- Click + Additional Route
Rule.
- Enter Route Rules details as
follows:
- TARGET TYPE: Select Internet
Gateway.
- DESTINATION: 0.0.0.0/0
- COMPARTMENT: Select your network compartment.
- TARGET INTERNET GATEWAY:
Select the previously created gateway.
- Click Create Route
Table at the bottom of the window.
Perform these steps twice - once for the Oracle E-Business Suite Cloud Manager Compute instance route tables and once for the load balancer route tables.
You will create two separate security lists, one for the Oracle
E-Business Suite Cloud Manager Compute instance and one for the load balancer.
In the following examples, we will use the names ebscmvm-seclist and lbaas-seclist,
respectively.
Create the Oracle E-Business Suite
Cloud Manager Security List
- On the Virtual Cloud Networks screen,
click the link with the name of your VCN, such as ebscm-vcn.
- Under Resources in the
navigation menu at the left, select Security Lists.
- Click Create Security List:
- CREATE IN COMPARTMENT: Select your network compartment.
- SECURITY LIST NAME:
Specify a name such as ebscmvm-seclist.
- Under Allow Rules For
Ingress:
- Click + Additional
Ingress Rule.
- For the first rule that is
needed, modify the default rule as follows:
- SOURCE TYPE:
CIDR
- SOURCE CIDR:
Enter the CIDR of your choice
- IP PROTOCOL:
TCP
- SOURCE PORT RANGE:
All
- DESTINATION PORT RANGE:
22
- For the second rule that is
needed, click + Additional Ingress Rule and enter the
following values:
- SOURCE TYPE:
CIDR
- SOURCE CIDR:
0.0.0.0/0
- IP PROTOCOL:
ICMP
- TYPE:
3
- CODE:
4
- For the third rule that is
needed, click + Additional Ingress Rule and enter the
following values:
- SOURCE TYPE:
CIDR
- SOURCE CIDR:
Enter the CIDR of your LBaaS subnet, lbaas-subnet-ad1. For example,
10.0.1.0/24. Note that the subnet is created in the next step.
- IP PROTOCOL:
TCP
- SOURCE PORT RANGE:
All
- DESTINATION PORT RANGE:
8081
- For the fourth rule that is
needed, click + Additional Ingress Rule and enter the
following values:
- SOURCE TYPE:
CIDR
- SOURCE CIDR:
Enter the CIDR of your LBaaS subnet, lbaas-subnet-ad2. For example,
10.0.2.0/24. Note that the subnet is created in the next step.
- IP PROTOCOL:
TCP
- SOURCE PORT RANGE:
All
- DESTINATION PORT RANGE:
8081
Note that
the fourth rule is not required if a regional subnet is chosen for your public
load balancer or if you are in a single availability domain region.
- Under Allow Rules For
Egress:
- Click + Additional
Egress Rule.
- For the single rule that is
needed, modify the default rule as follows:
- DESTINATION TYPE:
CIDR
- DESTINATION CIDR:
0.0.0.0/0
- IP PROTOCOL:
TCP
- SOURCE PORT RANGE:
All
- DESTINATION PORT RANGE:
All
- Click Create Security List at the bottom of the window.
Create the Load
Balancer Security List
- On the Virtual Cloud Networks screen,
click the link with the name of your VCN, such as ebscm-vcn.
- Under Resources on the
navigation menu at the left, select Security Lists.
- Click Create Security List:
- CREATE IN COMPARTMENT: Select your network compartment.
- SECURITY LIST NAME:
Specify a name such as lbaas-seclist.
- Under Allow Rules For
Ingress:
- Click + Additional
Ingress Rule and enter the following values for the ingress
rule that is needed:
- SOURCE TYPE:
CIDR
- SOURCE CIDR:
Enter the CIDR corresponding to the IP addresses of your client
machines that will access the Cloud Manager UI.
- IP PROTOCOL:
TCP
- SOURCE PORT RANGE:
All
- DESTINATION PORT RANGE:
443 or other port of your choice. This port will be used in section 5.3
step 5, when prompting for the "Enter Load Balancer Listener
Port".
- Under Allow Rules For
Egress:
- Click + Additional
Egress Rule and enter the following values for the egress rule
that is needed:
- DESTINATION TYPE:
CIDR
- DESTINATION CIDR:
0.0.0.0/0
- IP PROTOCOL:
TCP
- SOURCE PORT RANGE:
All
- DESTINATION PORT RANGE:
All
- Click Create Security
List at the bottom of the window.
3.2.4 Create Subnets
You will create the following new subnets:
- One regional or availability
domain-specific public subnet where the Oracle E-Business Suite Cloud
Manager Compute instance will be created.
- This may be referred to as the
"provisioning VM subnet."
- Either one or two subnets for creating
the load balancer for the Oracle E-Business Suite Cloud Manager.
- Create only one subnet for the
load balancer if any of the following are true:
- You are using a regional
subnet.
- You are in a single
availability domain region.
- Alternatively, if you choose to
deploy using availability domain-specific subnets in a multiple
availability domain region, you will create two subnets.
You will need to specify your own names and parameters, but you can use the examples in the following two tables for guidance.
If you choose to use regional subnets, refer to the following example:
Subnet Name CIDR Block Route Table Subnet Access Security List
ebscm-subnet-ad1 10.0.0.0/24 ebscm-RouteTable Public subnet ebscmvm-seclist
lbaas-subnet-ad1 10.0.1.0/24 lbaas-RouteTable Public subnet lbaas-seclist
To create a new subnet:
- On the Virtual Cloud Networks screen,
click the link with the name of your VCN, such as ebscm-vcn.
- Under Resources on the
navigation menu at the left, select Subnets.
- Click Create Subnet,
specifying your choice for the following parameters:
- NAME
- SUBNET TYPE:
Select either the REGIONAL (RECOMMENDED) or AVAILABILITY
DOMAIN-SPECIFIC radio button from the drop-down list. If you
choose AVAILABILITY DOMAIN-SPECIFIC, select your availability
domain.
- CIDR BLOCK
- ROUTE TABLE:
Ensure you choose a route table that has a target type of Internet
Gateway.
- SUBNET ACCESS:
Select the PUBLIC SUBNET radio button.
- SECURITY LIST
- Click Create at the
bottom of the window.
Repeat
these steps for each of the subnets you create.
Create Oracle E-Business Suite Cloud Manager Compute Instance
Oracle E-Business Suite Cloud Manager administrator performs all tasks as described.
Note: Oracle E-Business Suite Deployment on OCI in a Hybrid DNS Configuration always requires access to a VCN DNS resolver. If you are using such a configuration, ensure that IP address 169.254.169.254 is listed as a DNS server in the DHCP options.
- Log in to the OCI Service Console.
- In the menu on the left panel
under the heading, navigate to Marketplace > Applications.
- Then, click the Oracle
E-Business Suite Cloud Manager image.
- In the Version drop-down
list, ensure that the default of Oracle-EBS-Cloud-Manager-20.1.1.2-<date> is
selected.
- Select the compartment where you
plan to install Oracle E-Business Suite Cloud Manager. For example, ebscm-compartment.
- Review and accept the Terms of
Use.
- Click Launch Instance.
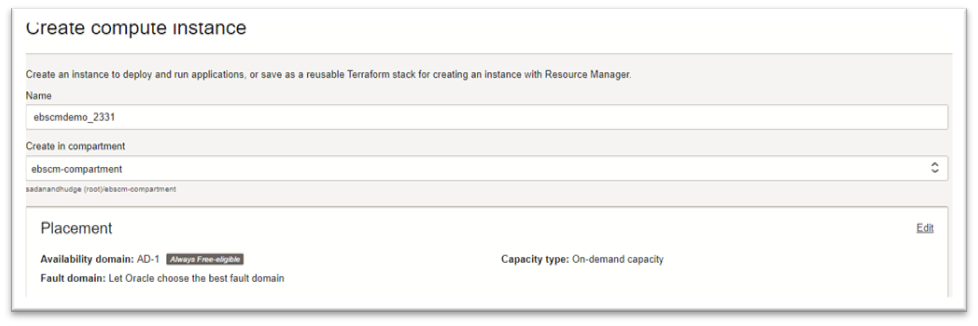
- In the Create Compute Instance dialog
box, specify the following:
- Under Name, enter
your choice of name for your instance. For example, ebscm-instance.
- In Create in Compartment,
choose your compartment for your instance in the drop-down list.
- Under Image or Operating
System, you will see the name of the OCI Console Marketplace
image: Oracle E-Business Suite Cloud Manager.
- Under Availability
Domain, make a suitable selection (based on the subnets you created
previously) from the displayed options.
- Select the "Choose a Fault
Domain for this Instance" checkbox, and then select a fault domain
from the drop-down list.
- Under Shape, select
a suitable shape. To do so, click Change Shape. Then select
your desired shape (for example, select Intel Skylake and then
"VM.Standard 2.2").
- Under Configure
Networking:
- From the Virtual Cloud
Network Compartment drop-down list, select the compartment
where your VCN resides. For example, network-compartment.
- From the Select a
Virtual Cloud Network drop-down list, choose your VCN. For
example, ebscm-vcn.
- Under Subnet
Compartment, select the compartment where your VCN resides. For
example, network-compartment.
- Under Subnet,
specify the Oracle E-Business Suite Cloud Manager subnet. For
example, ebscm-subnet-ad1.
- If the VM is associated with a
public subnet and you want to assign a public IP address, select the
"Assign a Public IP Address" radio button.
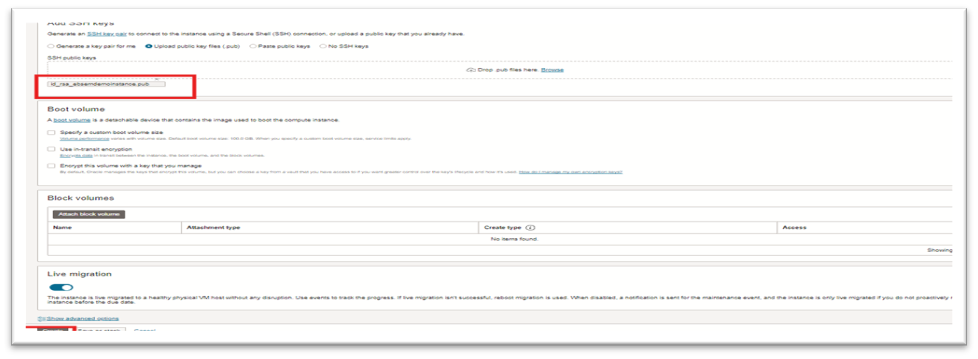
- Under Add SSH Keys,
choose one of the following two options, either (i) or (ii):
- Select the Choose SSH
Key Files radio button, and then drag and drop or browse to
specify the file containing your SSH public key generated previously.
- Alternatively, select the Paste
SSH Keys radio button and paste the SSH public key content in
the text field provided, using the content of the public key generated
previously.
- Leave the values in the Boot
Volume section unchecked, which results in accepting the default
volume size.
- Click the Create button
at the bottom of screen.
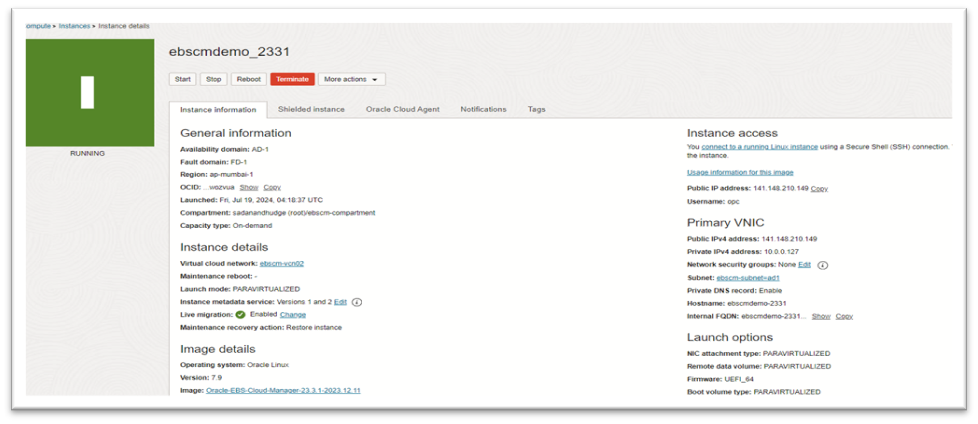
- After the instance has been created
(provisioned), it will appear in the instance list. To view full details
about it, including IP addresses, click the instance name in the list.
- When the Oracle E-Business Suite Cloud Manager instance is fully provisioned and running, you can connect to it by following the instructions in Connecting to an Instance in the Oracle Cloud Infrastructure Documentation.
ssh opc@IP address
The Oracle
E-Business Suite Cloud Manager administrator and tenancy administrator perform
all the tasks as described.
Follow the
instructions in this section to configure your Oracle E-Business Suite Cloud
Manager Compute instance. You will perform many of these operations from the
OCI Service Console.
Configure Authentication API Keys
1. If you haven't already, create an .oci directory to store the
credentials:
mkdir ~/.oci
2. Generate the private key with one of the following commands.
To generate the key, encrypted with a passphrase you provide when
prompted:
openssl genrsa -out ~/.oci/oci_api_key.pem -aes128 2048
To generate the key with no passphrase:
openssl genrsa -out ~/.oci/oci_api_key.pem 2048
3. Change the file permission to ensure that only you can read the
private key file:
chmod go-rwx ~/.oci/oci_api_key.pem
4. Generate the public key from your new private key:
openssl rsa -pubout -in ~/.oci/oci_api_key.pem -out ~/.oci/oci_api_key_public.pem
5. Copy the contents of the public key to the clipboard using or a
similar tool (you'll need to paste the value into the Console later). For
example:
cat ~/.oci/oci_api_key_public.pem
{
[opc@ebscmdemo-2331
~]$ mkdir ~/.oci
[opc@ebscmdemo-2331
~]$ openssl genrsa -out ~/.oci/oci_api_key.pem 2048
Generating
RSA private key, 2048 bit long modulus
...................................................................................................................................+++
............................................................................+++
e is 65537
(0x10001)
[opc@ebscmdemo-2331
~]$ chmod go-rwx ~/.oci/oci_api_key.pem
[opc@ebscmdemo-2331
~]$ openssl rsa -pubout -in ~/.oci/oci_api_key.pem -out ~/.oci/oci_api_key_public.pem
writing
RSA key
[opc@ebscmdemo-2331
~]$ cat ~/.oci/oci_api_key_public.pem
-----BEGIN
PUBLIC KEY-----
MIIBIjANBgkqhkiG9w0BAQEFAAOCAQ8AMIIBCgKCAQEA0Ac0nfGUi06FbPJBbNG/
6SKmUUtkFlHgZh+yO9SiBQi4+h80EWo4lCiGk3HY2Tyo860JnjJTk1Sx5ijYdACa
+Q7zDDoD78WLR4v9EfzAuu6RiYcMKlh2YUiR6a5RuG/LG/PglN6cuw7F5T1sb6pg
SODJ6ukmTx3Vo4emkst3HRh0dZWbihFxAk0BZ3SEUjdprj2Bbvd5SOB9oYWacEgd
dTAecwYHygiFB21NnABhAbKZOvNig+u/DDDHrTv3/Jzf+R2RFpxyRf1jfHnmQpFG
WbYD2yG8d+6H/mF8cwkRAmdxNwEIMwV14vx5XnnUm1fg/eMf6JoilIpreRL8gzbH
6QIDAQAB
-----END
PUBLIC KEY-----
[opc@ebscmdemo-2331
~]$
}
Upload the public pem key to the Oracle EBS Cloud Manager User
Priyanka.hudge09@gmail.com =>API Key=>
Paste public key file =>add close
Identify Credential Required
for Configuration Scripts
Tenancy
OCID: ocid1.tenancy.oc1..aaaaaaaaduzzgd35ujbwii76ngd5u4ykvywv7znbny4y5jjgewa2z57ndlla
User OCID: ocid1.user.oc1..aaaaaaaarqh2eqtiffbgtfstp7j7i4o4w5cmogq7eflvepsht2ehjut2ji3a
API singing path: home/opc/.oci/oci_api_key.pem
Change the
permission:
cd /home
chmod 775 opc
cd /home/opc/.oci
sudo chown oracle:opc oci_api_key.pem
{
[opc@ebscmdemo-2331 ~]$ cd /home
[opc@ebscmdemo-2331 home]$ chmod 775 opc
[opc@ebscmdemo-2331 home]$ cd /home/opc/.oci
[opc@ebscmdemo-2331 .oci]$ sudo chown
oracle:opc oci_api_key.pem
[opc@ebscmdemo-2331 .oci]$
}
Run Oracle E-Business Suite Cloud Manager Configure Script For the First Time
sudo su - oracle
cd /u01/install/APPS/apps-unlimited-ebs/bin
perl configure.pl
Before running the configure.pl scripts, need the below mentioned values
Admin
password OcItArGeT$345
Tenancy
OCID: ocid1.tenancy.oc1..aaaaaaaaduzzgd35ujbwii76ngd5u4ykvywv7znbny4y5jjgewa2z57ndlla
User OCID: ocid1.user.oc1..aaaaaaaarqh2eqtiffbgtfstp7j7i4o4w5cmogq7eflvepsht2ehjut2ji3a
API singing path: /home/opc/.oci/oci_api_key.pem
[opc@ebscmdemo-2331
.oci]$ sudo su - oracle
[oracle@ebscmdemo-2331
~]$ cd /u01/install/APPS/apps-unlimited-ebs/bin
[oracle@ebscmdemo-2331
bin]$ ls -lrt configure.pl
-rwxr-xr-x.
1 oracle oinstall 3455 Dec 6 2023 configure.pl
[oracle@ebscmdemo-2331
bin]$ perl configure.pl
Created
log file:
/u01/install/APPS/apps-unlimited-ebs/out/configure_2024-07-19_04_33_33.log
===========================================================
Configuring
Oracle E-Business Suite Cloud Manager VM 23.3.1
===========================================================
Creating ssh key pair
Enter New Oracle E-Business Suite Cloud Manager Admin Password : *************
Re-enter New Oracle E-Business Suite Cloud Manager Admin Password : *************
Enter
Oracle E-Business Suite Cloud Manager Admin User OCID (Non-Federated) : ocid1.user.oc1..aaaaaaaarqh2eqtiffbgtfstp7j7i4o4w5cmogq7eflvepsht2ehjut2ji3a
Enter Full
path to API Private Signing Key :
/home/opc/.oci/oci_api_key.pem
Enter Tenancy OCID : ocid1.tenancy.oc1..aaaaaaaaduzzgd35ujbwii76ngd5u4ykvywv7znbny4y5jjgewa2z57ndlla
Validating OCI credentials. Please wait.
Creating
user specific OCI configuration file,
/u01/install/APPS/.oci/priyanka.hudge09@gmail.com.
User specific OCI configuration file created successfully.
Available
groups from OCI for provided user:
Group
Name
Description
----------
-----------
1: ebscmadmin-grp Oracle E-Business
Suite Cloud Manager administrators group
2: netadmin-grp Network
administrator group
3: Administrators Administrators
Choose
Oracle E-Business Suite Cloud Manager Administration group from above list: 1
Do you wish to use an existing Load Balancer??
1: yes
2: no
Enter your choice: 2
Choose Load Balancer visibility type:
1: Public
2: Private
Enter your choice: 1
Choose Size of Bandwidth for Flexible Shape Load Balancer:
Enter Minimum Bandwidth in Mbps : 10
Enter Maximum Bandwidth in Mbps : 10
Available List of Subnets:
Availability
Domain: yxJL:AP-MUMBAI-1-AD-1
------------------------------
1:
Ibaas-subnet-ad1
Choose
subnet from above list: 1
Enter Load
Balancer Listener Port
: 443
Enter CIDR
Block (Range) from which Client can Access Load Balancer Listener Port:
0.0.0.0/0
----------------------------------------------------------------------------------------------------------
Summary of
Inputs
----------------------------------------------------------------------------------------------------------
Oracle
E-Business Suite Cloud Manager User Name ( Non Federated ) : priyanka.hudge09@gmail.com
Oracle
E-Business Suite Cloud Manager User OCID ( Non Federated ) :
ocid1.user.oc1..aaaaaaaarqh2eqtiffbgtfstp7j7i4o4w5cmogq7eflvepsht2ehjut2ji3a
Fingerprint
of API Public Key
: e0:b1:aa:09:35:b6:c4:0a:36:e7:7d:17:88:f1:e7:f6
Path to
Private PEM key file
: /home/opc/.oci/oci_api_key.pem
Tenancy
OCID :
ocid1.tenancy.oc1..aaaaaaaaduzzgd35ujbwii76ngd5u4ykvywv7znbny4y5jjgewa2z57ndlla
Region
: ap-mumbai-1
Oracle
E-Business Suite Cloud Manager VM Compartment Name : ebscm-compartment
Oracle
E-Business Suite Cloud Manager VM Compartment OCID :
ocid1.compartment.oc1..aaaaaaaayyfwwmftovve6vshkjghmv2jey4ulabnlhkttngyf4hlkgq557aq
Oracle
E-Business Suite Cloud Manager Administration Group Name : ebscmadmin-grp
Oracle
E-Business Suite Cloud Manager Administration Group OCID :
ocid1.group.oc1..aaaaaaaasmp5gt7jo3h4dppoiwfi5ud3g5q7oyko4v3rwwtfm6swf65ymueq
Network
Compartment Name
: network-compartment
Network
Compartment OCID
:
ocid1.compartment.oc1..aaaaaaaarilbtvfcvpsvfrgo4r7dh4usduuqvnolahui456f6nlk52xgiutq
Network
VCN Name
: ebscm-vcn02
Network
VCN OCID
:
ocid1.vcn.oc1.ap-mumbai-1.amaaaaaa62arzzqahhpyanqhj3le464oqdo46hyupnywgra7t23ojzj25yoa
Use an
existing Load Balancer
: false
Load
Balancer Listener Port
: 443
CIDR Block
(Range) from which Client can Access Load Balancer Listener Port : 0.0.0.0/0
Load
Balancer Visibility Type
: Public
Load
Balancer Shape
: flexible
Load
Balancer Minimum Bandwidth in Mbps : 100
Load
Balancer Maximum Bandwidth in Mbps : 100
Load
Balancer Subnet Name
: Ibaas-subnet-ad1
Load
Balancer Subnet OCID
:
ocid1.subnet.oc1.ap-mumbai-1.aaaaaaaalp73ihi5z2othqq36tbjwkgdhnwrd64yet6xfobuvpavunstcluq
Load
Balancer Subnet CIDR
: 10.0.1.0/24
----------------------------------------------------------------------------------------------------------
Do you wish to continue??
1: yes
2: no
Enter your choice: 1
Changing
default root password with user-provided password.
Securing
database installation.
Setting up Load Balancer for Oracle E-Business Suite Cloud Manager VM. This may take a few minutes. Please wait.
Checking
Security Lists of LBaaS Subnet, Ibaas-subnet-ad1
Checking
Security Lists of Oracle E-Business Suite Cloud Manager VM Subnet,
ebscm-subnet=ad1 with source CIDR 10.0.1.0/24
==============================================================
Load
Balancer ebscmdemo-2331-prov-vm-lbaas configuration completed. Review screen
messages above to determine if security rules are missing and must be added in
order to access the load balancer URL.
==============================================================
Register
confidential application in IDCS with URL: https://146.56.53.9:443 and then
re-run this script to update your IDCS configuration.
==============================
Finished
Configuring Oracle E-Business Suite Cloud Manager VM.
Login
URL: https://146.56.53.9:443
Ensure the
confidential application is correctly configured in IDCS as per the
documentation.
==============================================================
[oracle@ebscmdemo-2331
bin]$
Configure IDCS Integration
with Oracle E-Business Suite Cloud Manager
1. Create Groups and Users in
Identity Cloud Service
select My
Home.
Select Service
users control
click Admin Console
Username: Priyanka.hudge09@gmail.com
Password: Shreenidhi@45678
2. Register Oracle E-Business
Suite Cloud Manager as a Confidential Application
- Open the navigation menu and click Identity
& Security. Under Identity, click Domains.
- Select the root compartment in the Compartment drop-down
list.
- Within the list of domains, click the
link for the "Default" domain.
- Click Integrated applications in
the menu on the left.
- Click Add application.
- Select Confidential Application in
the dialog box.
- Click Launch Workflow.
- Under Add application details, enter the
following:
- Name:
Enter a name.
- Description:
Enter a description.
- Click Next.
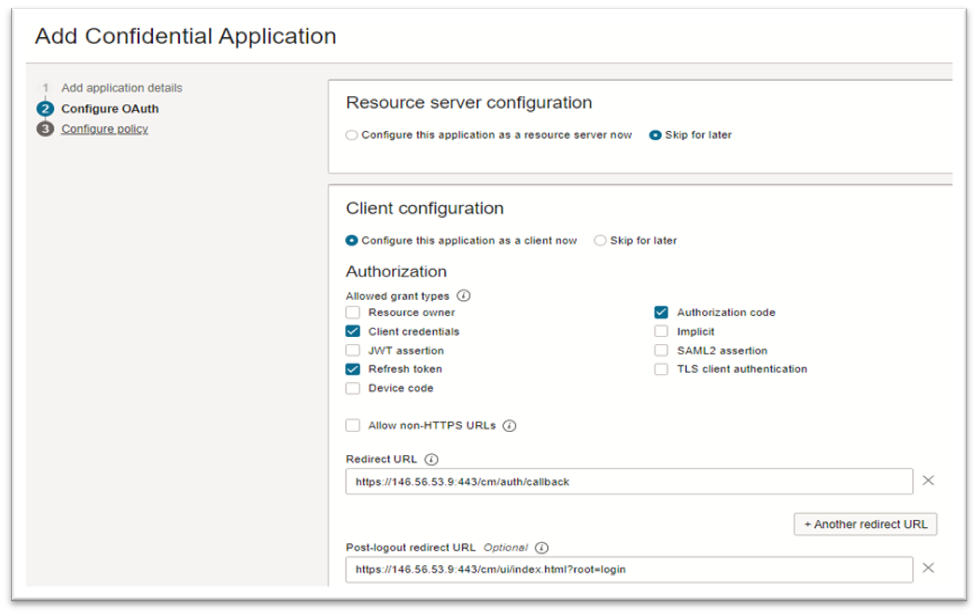
- Under Configure OAuth:
a.
Click Configure this application as a
client now.
b.
Under Allowed Grant Types, select the
following options:
- Client Credentials
- Refresh Token
- Authorization Code
Additionally,
if you plan to create standby environments or to upgrade environments from
Oracle E-Business Suite Release 12.1 to Release 12.2, select the Resource Owner
option.
c.
Redirect URL: This is the load balancer URL from
step 7 of Run Oracle
E-Business Suite Cloud Manager Configure Script for the First Time in
the following format: <Your Load Balancer URL>/cm/auth/callback.
For example: https://xxx.xxx.xx.xxx:xxx/cm/auth/callback
d.
Post-Logout Redirect URL: <Your
Load Balancer URL>/cm/ui/index.html?root=login. For example: https://xxx.xxx.xxx.xxx:xxx/cm/ui/index.html?root=login
e.
Logout URL: Leave this field empty.
f.
Under Client Type, ensure that the Confidential radio
button is selected.
g.
Select the Introspect option
for Allowed Operations.
h.
Under Token Issuance Policy, select the Add
app roles checkbox.
i.Click Add roles.
ii.Select Authenticator Client
and Me.
iii.Click Add, and then
click Next.
- Under Configure policy, click Finish.
- Make a note of the following values under
General Information:
- Client ID
- Client secret (In order to view,
click Show secret.)
- Click Activate and
confirm to activate the confidential application.
- Record the Domain URL found in the Overview page for the domain
Activate
Note down the below mentioned:
Client ID: 09c43ba7b35646e6a4b2ac2bee72598c
Client secret: 15726537-4683-4584-9f27-c3794c5259b0
Idcs
Client Tenant URL:
https://idcs-e1e23ae5b09242d598377eca787b8f61.identity.oraclecloud.com:443
Idcs: idcs-e1e23ae5b09242d598377eca787b8f61
Run Oracle E-Business Suite Cloud Manager Configure Script for the Second Time:
$ sudo
su - oracle
$ cd /u01/install/APPS/apps-unlimited-ebs/bin
$ perl configure.pl
Admin
password: OcItArGeT$345
Client ID: 09c43ba7b35646e6a4b2ac2bee72598c
Client
secret: 15726537-4683-4584-9f27-c3794c5259b0
Idcs Client Tenant: Idcs: idcs-e1e23ae5b09242d598377eca787b8f61
{
[oracle@ebscmdemo-2331
bin]$ cd /u01/install/APPS/apps-unlimited-ebs/bin
[oracle@ebscmdemo-2331
bin]$ perl configure.pl
Created
log file:
/u01/install/APPS/apps-unlimited-ebs/out/configure_2024-07-19_05_18_48.log
===========================================================
Configuring
Oracle E-Business Suite Cloud Manager VM 23.3.1
===========================================================
Enter
Oracle E-Business Suite Cloud Manager Admin Password : *************
Enter IDCS
Client ID
: 09c43ba7b35646e6a4b2ac2bee72598c
Enter IDCS
Client Secret
: 15726537-4683-4584-9f27-c3794c5259b0
Enter IDCS
Client Tenant
: idcs-e1e23ae5b09242d598377eca787b8f61
----------------------------------------------------------------------------------------------------------
Summary of
Inputs
----------------------------------------------------------------------------------------------------------
IDCS
Client ID
: 09c43ba7b35646e6a4b2ac2bee72598c
IDCS
Client Secret
: 15726537-4683-4584-9f27-c3794c5259b0
IDCS
Client Tenant
: idcs-e1e23ae5b09242d598377eca787b8f61
IDCS
Host
: https://idcs-e1e23ae5b09242d598377eca787b8f61.identity.oraclecloud.com
----------------------------------------------------------------------------------------------------------
Do you wish to continue??
1: yes
2: no
Enter your choice: 1
Database schema is already configured. No action needed.
Load Balancer ebscmdemo-2331-prov-vm-lbaas is already configured. No action needed.
Configuring IDCS
Reconfiguring
Chef Server. Please wait.
Installing
Chef Server. Please wait.
Starting
ChefServer.
Uploading
cookbooks
Stopping
Node and Job Server if running.
Starting
Node and Job Server.
==================================================================================
Finished
Configuring Oracle E-Business Suite Cloud Manager VM.
Login URL:
https://146.56.53.9:443
Ensure the
confidential application is correctly configured in IDCS as per the
documentation.
==================================================================================
[oracle@ebscmdemo-2331
bin]$
Log in to Oracle E-Business Suite
Cloud Manager
- Navigate to Notepad in your start menu.
- Hover over Notepad, right-click, and
select the option Run as Administrator.
- In Notepad, navigate to File >
Open.
- Browse
to C:\\Windows\System32\drivers\etc.
- Find the file "hosts".
6.
In the hosts file, scroll down to the end of the
content.
7.
Add the following entry to the very end of the
file: <lb_public_ip>
myebscm.ebshol.org
8. Save the file.
Oracle E Business Suite Cloud Manager URL
Login
URL: https://IP address:443
Username :
admin
CM Admin
password: OcItArGeT$345
CM ADministrator Username: Priyanka.hudge09@gmail.com
CM Administrator User password: Shreenidhi@45678
Reference:-
Deploying Oracle E-Business Suite Cloud Manager Version 20.1.1.X on Oracle Cloud Infrastructure (Doc ID 2434500.1)
Oracle E-Business Suite Cloud Manager Guide:
https://docs.oracle.com/cd/E26401_01/doc.122/f35809/T679330T679339.htm










No comments:
Post a Comment